The Pyramid Healthcare Cloud Apps are intended to assist with Reservations, Contact Management, and the Employee Assistance Program
Objective
Manage and Track Client Communications
- Dashboard
- Quick graphical view of recent activity
- Accounts
- View and create Accounts / Companies
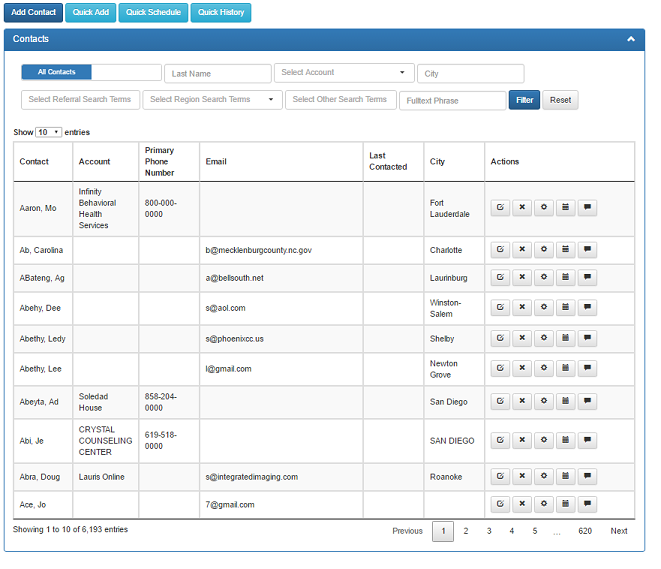
- Contacts
- View and create Contacts / People
- Calendar
- View scheduled contact communication events and historical events
- Mailing
- Export physical and email addresses
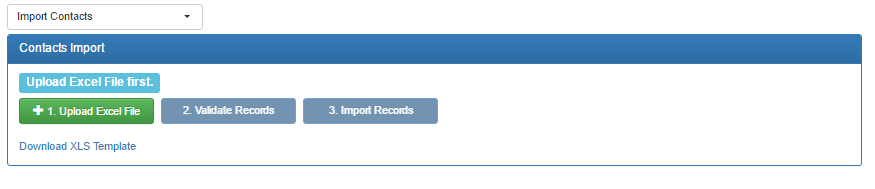
- Import
- Import Accounts
- Import Contacts
There are 2 environments for each web applicaton: Demo and Live
- The Demo app is where users can play around and perform training. It is also where new updates are first installed
- The Live app is where the live data is stored
Logins/Passwords are typically different between the applications and environments
Powered and Built by Mountain Bird Technology

Login Screen
There are 2 environments for each web applicaton: Demo and Live
- The Demo app is where users can play around and perform training. It is also where new updates are first installed
- The Live app is where the live data is stored
Logins/Passwords are typically different between the applications and environments
The title bar or address bar should indicate the web app environment (Demo or Live)
Usernames are case sensitive, as are the passwords, i.e. Jdoe is not the same as JDoe
 Top Menu
The top right menu contains links to
- Information about the web application
- Change Password
- Logoff
- Home
- Administration
 Main Menu
The middle menu contains the main links used to navigate through the web application
 Powered and Built by Mountain Bird Technology
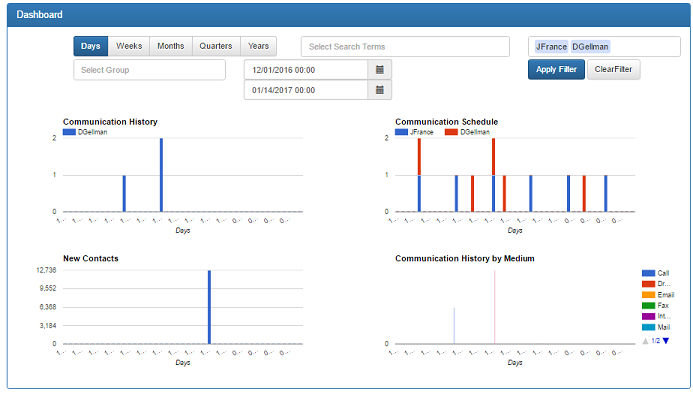
Dashboard
The Dashboard is the first page shown after login. It is a graphical view of recent activity
 Powered and Built by Mountain Bird Technology
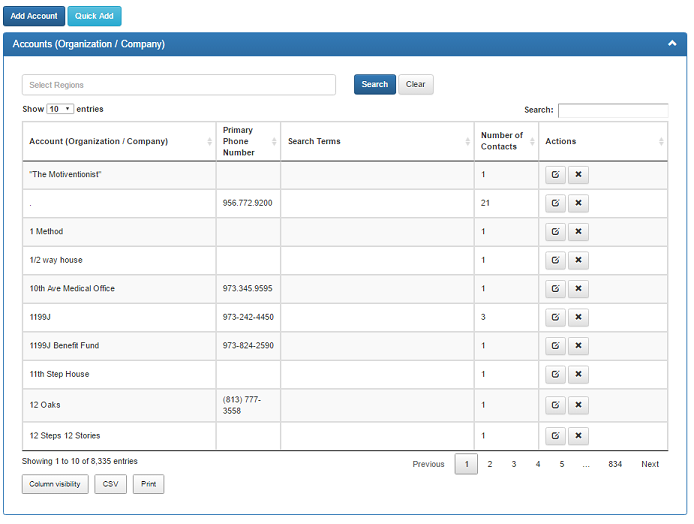
Accounts
The Account section is where top-tier listings are made for Companies/Organizations
Features
- Each entry has Basic Details, Addresses, Phone Numbers, Notes, and Search Terms
- New entries can be added by clicking the blue Add button above the list
- Columns can be sorted by clicking each column header
- The table contents can be searched by entering text in the Search box
- More rows can be displayed by changing the Display dropdown
- The entries are displayed in pages, which can be navigated through using the bottom links when there are more than 1 page of results
- Extra columns can be displayed by clicking the botton Columns button
- Individual entries can be Viewed, Edited, or Deleted using the Action buttons on each row
- The entire list can be Exported to CSV or Printed with the bottom buttons
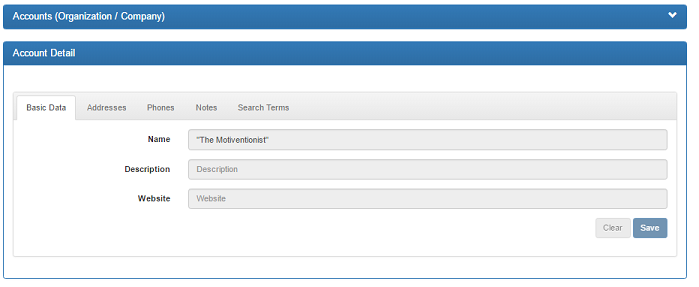
 View
View
If the logged in user only has the View permission they are restricted to read-only
Clicking the View button on each row show the details
Use the white arrow to return to the main list
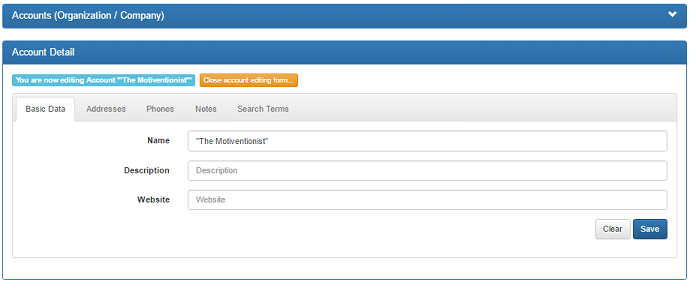
 Edit
Edit
If the logged in user has the Edit permission they are allowed to make changes
Clicking the Edit button on each row show the details about that row and allow updating
Click the blue Save button to save changes
Click the yellow/orange Close button to return to the main list
 Delete
If the logged in user has the Edit permission they are allowed to delete entries
Clicking the Delete button on each row will delete that entry
 Powered and Built by Mountain Bird Technology
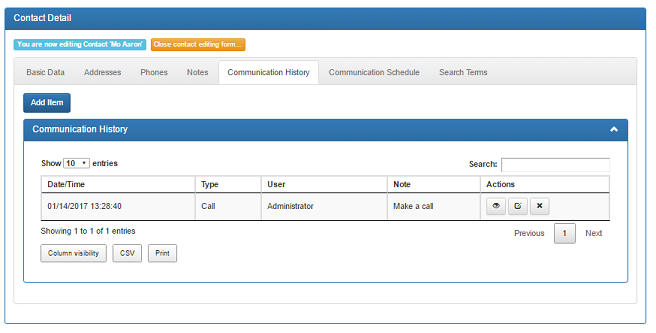
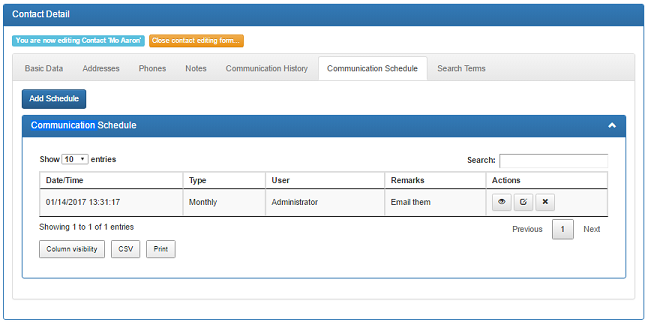
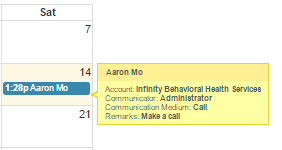
Calendar
The contact communication history and schedule can be viewed on the calendar
Blue entries are history events
Orange entries are scheduled events
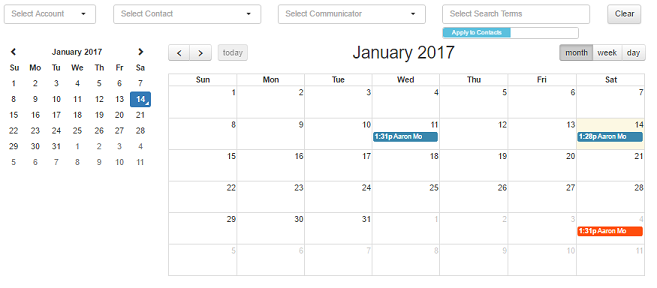
More details are available by hovering the mouse over the History and Schedule entries
Left click the orange schedule entry to create a history record
 Powered and Built by Mountain Bird Technology
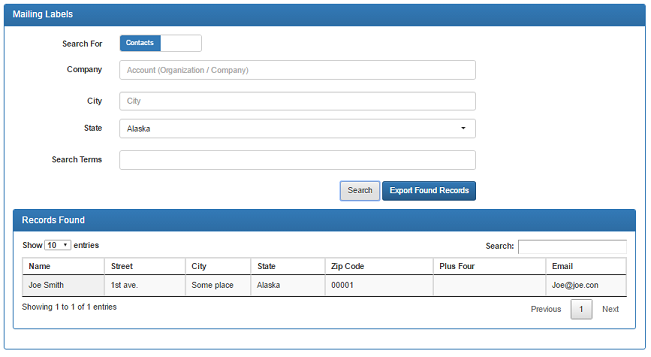
Mailing
The Contact addresses can be searched and exported to Excel (CSV)
Only addresses that are marked "Is Mailing" will be used for export
 Powered and Built by Mountain Bird Technology
Phone App
The CRM App has a Phone App that is a trimmed version of the Web App
Download & Install the Phone App v1.2 (17)
- Apple IOS
Using Safari, click here to download the install file
Click Install at the prompt
In iOS 9.1 and lower, go to Settings - General - Profiles - tap on the MOUNTAIN BIRD ENTERPRISES Profile - tap on Trust button
In iOS 9.2+, go to Settings - General - Device Management - tap on MOUNTAIN BIRD ENTERPRISES Profile - tap on Trust button
- Google Android
Click here to download the install file
Click OK to download the file
After downloading, open the downloads or notifications
In your Download Notifications, click the CRM file to open
click the Settings button at the bottom of the "Install Blocked" message
In the Settings - Security page check the Unknown Source box
Confirm the unknown source message
Review the permissions and click Install
Open the app, if you wish, an Icon will be created on the main phone page for the CRM app
First Use - Configure & Pull Down the Contacts
- Enter the URL to the web app after opening the CRM Phone App
https://sales.pyramidapp.com/Demo
https://sales.pyramidapp.com/Live
Enter your username and password
Both are care sensitive
- The first page is the Schedule or Calendar page
- Click the Main Menu link at the top left
- Click on the Settings link
- At the bottom of the screen click Synchronization, between General and Support
Click the link named: Pull Down Contacts
The download may take a minute or two to process. There should be a synchronized/imported OK message when completed
- In the Main Menu Contacts you can search by entering first 2-3 letters of a person's last name
Updating the Phone App
- If a new version of the phone app comes out, use these instructions to update
- Ensure your contacts are pushed up
In Settings - Synchronization there should be 0s for pending contacts and calendar events
If there are pending changes click the "Push Unsaved Work" link
- Delete/Uninstall the CRM App from your phone
- Install the updated phone app with the above "Download & Install" steps
- Log in using the above "First Use" steps
* Do not try to install the new phone app "over the top" of the old phone app
Submitting Logs for Analysis (after an error)
- Log off the phone app
Use the Main Menu logoff
- Log back in
Make sure your user name has the correct capitalization, JSmith is not jsmith
- Turn on Advanced logging
Go into Settings
Go into Support (on the bottom of the screen)
Click on Logging Level
Change to Debug
- Use the phone app like you were before
- After a couple errors or strange behavior, submit your log files
Go into Settings
Go into Support
Click Submit logs to server (to the right of mail)
Click on Submit DB to server (to the right of mail)
General Use / Overview
More info arriving soon
Powered and Built by Mountain Bird Technology